I certainly don't know, but your post has made me curious. If you could put that simple environment with the light source and the mirror prop (the female model is not necessary) all together in a scene subset and share it in another post, I'd gladly experiment with it.
Anyway, don't they use in photography and modeling reflectors with the idea you're explaining? And these do not have mirror-like surfaces.
Your second paragraph is EXACTLY how i came across this - i was making my own spotlights and searchlights which use parabolic reflectors for concentrating and focusing the light, and noticed they weren't behaving as I'd expect. There are a LOT of objects in our world which use light bouncing off mirrors and lenses, it'd be a shame if there was no way to implement this in daz.
(DAZ Studio) Does anyone know how I can get mirror surfaces to transmit light? They'll show an image of what's reflected, but I'm talking about having thing project the rays of light they're receiving, much as they do in the real world. If the distinction isn't clear; I made a sample scene: View attachment 4567892
Where (A) is a light source, (B) is the corner mirror, (C) is the figure standing around the hall corner
(To those thinking she's ever so slightly brighter - i did a test and that's almost all from having a surface closer to light - note when mirror shader is replaced with flat texture - it's comparable)
Seems like I must be missing something because the entire idea of raytracing graphics is predicting rays instead of just using computationally cheap tricks to simulate an image. Anyone know?
I've done some tests, that I'm putting below. The main difference with yours is that I do notice a significant difference in my tests, regarding how much light gets reflected, between having the mirror-like surface (full metallicity) or a non mirror-like surface (metallicity disabled).
Let's start with your set as it is. Nothing has been relocated or changed in another way here. The only difference is that I'm using my own female figure.
Then, I tweaked the properties of the reflector's surface with the hope of getting more light reflected onto the figure and the other passage. Mainly, top glossiness and reflectivity. It did very, very little.
As a final modification to the reflector, I made the surface mirror-like (full metallicity). As you can see, this got the more light reflected. The result is pretty identical to your initial set. Compare this picture below to the first one as evidence.
With that, I stopped experimenting with the reflective surface. Now it was time to see how the light emitter interacted with the mirror by moving it to different positions. For the next two renders, I hid my reflector and made your mirror visible again. In this first render, I brought the emitter very close to the mirror, as you can see. And yet, because of the placement and angle of the camera, we can't see the light source reflected in the mirror.
At last, I continued moving the emitter and placed it at the very end of the other passage, facing the mirror. This time around, we can see the light reflected in the mirror.
I hope that these tests may have been of any help to you. Based on these experiments, I don't see anything wrong. Everything has worked out as I would have expected. But I'm not an expert.
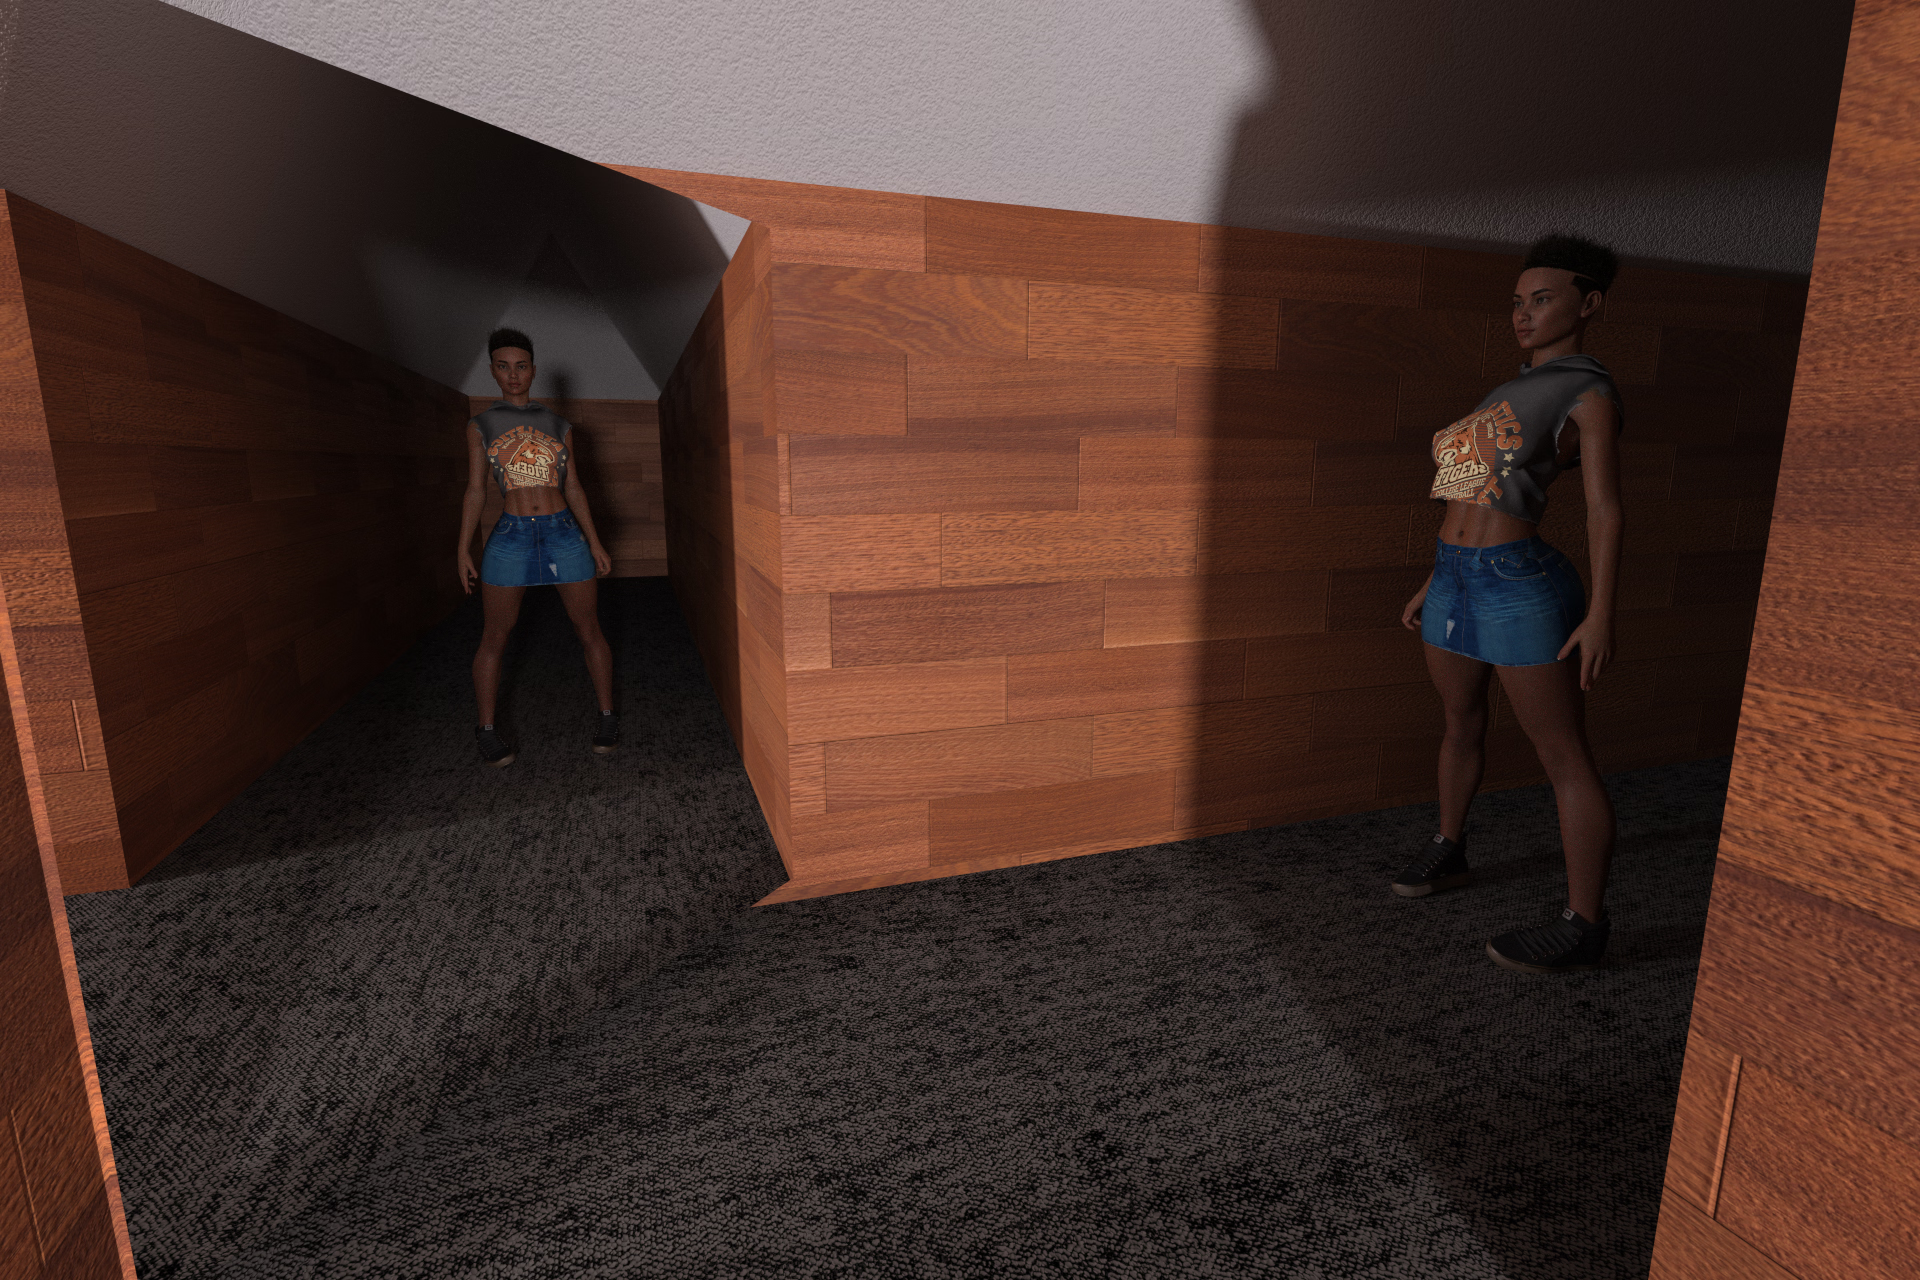
But IMO (i appreciate all your work dont get me wrong) - but this is missing the point - considering basic laws of optics, in this image:
In that configuration, If the figure was standinging say 8 feet from the mirror, we'd expect her to be receiving the same amount of light as if that corner where the mirror is was instead extended 8 feet. She clearly doesnt get this much light - furthermore the presence of the mirror does little to the original harsh shadows cast around the corner. Let me whip up a better scene and itll be easier to show what I'm talking about.
The light is pointed exactly at the hallway split at 0,0 and each figure is the same distance from that interface, meaning the 2 figures should have comparable illumination.
different purposes, not analogs. Blender is a comprehensive 3d modeling program, more in line with 3DS max or Maya. Daz is primarily a posing and rendering program. (of their rigged meshes only)
While some devs do rendering in Blender - it's plenty capable, most stick with Daz for rendering then use those other programs for when 3D editing is needed, or custom animations (daz rly rly bad at interpolation). For example, in my test scene above; i had quickly made that hallway mesh outside of daz, then used daz to render the image.
So the ultimate answer is both. But if you're new to any kind of 3d software I'd probably familiarize myself with daz first before diving into stuff with hierarchical materials trees and whatnot.
The light is pointed exactly at the hallway split at 0,0 and each figure is the same distance from that interface, meaning the 2 figures should have comparable illumination.
I don't know, man. I was going to suggest aiming the light directly at the center of the mirror. But considering that mesh lights spread very widely by default (I read 180º not long ago), it seems like a waste of time, since that mirror should be getting a lot of light already. You could try asking also on the Daz forums. You would get answers there as well most likely, and there are veterans of the application active there. If you decide to ask there, pass me the link, please, because I'm interested in following the topic.
I will try playing with your new set as well. But I won't have enough time for it until tomorrow most likely.
I've been using Daz for like around one year and a half or so and it's quite accessible for beginners IMHO. I haven't tried Blender yet, but I've read that it's more complete and also more complex.
Blender can do a LOT more and it far better at some things, but it is no where as easy to use (though it does have a lot better documentation and tutorials), you have to do actual modeling, not just moving sliders. Daz is designed more like a game's character/scene designer, it has a much lower learning curve (not that it's easy, just easier to get started).
In fact, you can use both, either like I do, making things for Daz in Blender, or making characters in Daz, and importing them into Blender to render, something I plan to do one day.
But if you don't know anything about either, I would start with Daz (assuming you have an nvid card).
The light is pointed exactly at the hallway split at 0,0 and each figure is the same distance from that interface, meaning the 2 figures should have comparable illumination.
I'm not sure if this can be of any interest, but starting from your initial set as it is, with the only difference of my own characters used instead of yours and that my camera placement is not identical to yours, If I replace all the wall surface with the mirror's one, I get this result.
What do you mean by "extract"?
Treasure of Nadia, as 99% of the games here, only has renders (images). There are some tools to extract the images/audio from an rpgm game, but you will not have the girl 3D assets, just the same jpg/png that you see while playing the game.
What do you mean by "extract"?
Treasure of Nadia, as 99% of the games here, only has renders (images). There are some tools to extract the images/audio from an rpgm game, but you will not have the girl 3D assets, just the same jpg/png that you see while playing the game.
How does renpy/visual novels work with the daz3d interactive license? While an earlier post (i think) says you don't need them; various other sources, including the wording of the Daz3d license agreement says otherwise.
How does renpy/visual novels work with the daz3d interactive license? While an earlier post (i think) says you don't need them; various other sources, including the wording of the Daz3d license agreement says otherwise.
The posing itself isn't hard, just bend and spread the legs, and bend in the arms.
If you mean her ass, then it looks like they might have used a smoothing modifier on her using the chair, but I could be wrong.
Okay, so I am having a texturing issue...
I did not want a set of chopsticks to be 175meg, so I converted the textures to jpg, but now they are showing way lighter than they should in iRay.
This is the png.
This is the Jpg in texture preview.
This is the jpg in iRay preview...
The posing itself isn't hard, just bend and spread the legs, and bend in the arms.
If you mean her ass, then it looks like they might have used a smoothing modifier on her using the chair, but I could be wrong.
Okay, so I am having a texturing issue...
I did not want a set of chopsticks to be 175meg, so I converted the textures to jpg, but now they are showing way lighter than they should in iRay.
Select the character, go to edit/object/geometry add smoothing modifier, then go into the setting for that mod (parameters), and add the stool as the thing you need to smooth around.
Same texure, all I did was change the color one from jpg to png. I already have it (jpg one) saved as a preset.
It is using a color, roughness x2, normal, metallic, and a bump.
-- Texture ------- iRay -----iRay w/png
**Alternately, does anyone know of another compressed image format that Daz likes? I know it won't see webp.
*** Okay, so update on my issue, on top of copy pasting the metallic part onto one that worked fine with no luck, and was about ready to give up and use the png, when I tried renaming the jpg (removed the spaces), and now it works...
I don't get it, others have spaces, the png has spaces, but this was the only one to do this...